Tuesday, October 6, 2015
Building Blocks Quilt-a-long
This project evolved from a need to stay in touch with one of them. My friend and I decided that we would both teach ourselves to free motion quilt. Our guidance was from Leah Day's Building Blocks Quilt pattern and videos.
We did most of it long distance after synchronizing our start in the spring of 2015. We both worked on the same block sets at the same time. We texted our progress shots and woes back and forth.
Finally, we both had all our blocks quilted and we decided on a mini quilting retreat in Augus to assemble the quilts. We scheduled a long weekend where she came to visit with her machine in tow. We instructed our spouses to entertain themselves while we sewed and sewed.
Neither of us quite finished that weekend, but we both finished our quilts in the following couple of weeks.
This was a wonderful project to keep my friend and I close. We both learned a lot and we want to do another project Ike this soon.
Sunday, February 3, 2013
Immersion Dyeing - My Way
Monday, February 13, 2012
Dyeing 101
The focus of this class is mixing primary colors to make the colors you want. I think the instruction is excellent. Candy has both videos and a written PDF for each lesson and there is a Q&A where she is quick to answer questions.
.
In our second dyeing session, we mixed the primary colors in as many ways as possible using a total of ten whole parts. Each mixed color is x parts yellow primary, y parts blue primary and z parts red primary, where x,y,and z are whole numbers that sum to 10. There are a total of 66 swatches in this set of samples.
It took me maybe three hours to prepare and label all the swatches, about four hours to do the dyeing in another session from the labeling and the washing and rising and ironing probably another three hours. The time commitment for this is significant, but look at the valuable product! With this and the knowledge gained from the gradient exercise, I should be able to make yarn colors I want for my weaving.
![]() |
| Turquoise, Light Red, Lemon Yellow, white swatch is one I missed |
Of course, I put my own twists on this. I used the same flagging tape that I use on my handspun skeins to label each swatch. I also cut the swatches twice as big so I will have some fabric leftover to play with once we assemble our "Candiotic Table" which will give us a valuable permanent record of our color recipes.
I also did the actual dyeing in a bowl, and dropped each swatch in a plastic bag for curing, discarding the little bit of leftover dye and fixative. This let me fit all my swatches into one plastic shoebox for curing in a warm place. I actually batched the swatches in a cardboard box with a heating pad to be sure they stayed warm and really cured well.
When it came to rinsing out, I washed each swatch and put it back into the plastic sandwich bag and added a little water for the initial soak. I put the bags in the plastic shoe boxes to catch any leaks. This did not take hardly any space and seems to have worked well.
Our next assignment is another 66 swatch set with different primaries. I have my swatches labeled with a different color of flagging tape to be sure they don't get mixed up with the first set, and hopefully, I will dye them tomorrow.
Dyeing 101 - Graidents
In this class we will be learning how to mix colors from primaries with the big product being permanent reference tables of recipes for colors. I have wanted to do this forever, and while I know I could do it without a class, it is not something I would do without an assignment.
Our first dyeing exercise was to dye gradients. I chose to dye five sets of quarter yard gradients in Deep Yellow, fuchsia red, light red, new black and sky blue. (Dharma Trading Company) With these sets, it will be easier to know how much dye to use when looking for a particular color tint.
My swatches are marked with flagging tape - the same thing I use to label my handspun skeins. I slightly modified Candy's excellent instructions in that I let the fabric batch in plastic bags and poured off any excess dye, after dyeing in a bowl. I started using this technique after I read the book Dyeing To Quilt, and it has worked for me and takes less batching space than Candy's method.
The class has both a written lesson and videos that accompany the web pages. There is also a Q&A with each lesson and Candy is quick to answer any questions that pop up.
The other thing about this class is that you can start it any time and work at your own pace. I am glad to be in the first group though, because the other students help keep me motivated. This is really a lot of work so it definitely needs time set aside to get the full benefit.
Next up is mixing three primaries for sixty six colors.
Tuesday, May 17, 2011
True Blue Warp
The instructions have seventeen different warping options with many types of fabric. It was really hard to choose which one to weave, but I finally settled on an undilatating twill with several shades of colors in the warp.
When I went shopping to try to find yarn (online of course because the nearest weaving store is 50 miles away), I soon decided that I was not going to be sure that what I bought would be what I had envisioned. The only way I could see to get the color control I wanted was to get out my fiber reactive dyes. I thought I would document the process I used in hope that it will help someone else.
![]() |
| Sample Stock mixtures with paper towel color testers |
![]() |
| Finished Skeins of Yarn with Paper Towel Color Swatches |
I think this yarn is going to make a pretty warp. I am very excited to see the fabric it makes.
Friday, April 22, 2011
Calculate Twice, Weave Once
![]() |
| Strickler 8 Shaft Patterns number 315-4 |
![]() |
| Two of each weft color - one for me and one for the exchange |
![]() |
| New labels |
Friday, September 17, 2010
Public Service Announcement
The burnt sienna color yarn is an wool-alpaca blend that I got from Zeilinger's Wool Mill several years ago when we were in Michigan. The pink is Romney from my friend Rusty's sheep. Thursday, September 9, 2010
I Can't Hear You
![]() |
| Handspun sorted by color - Sept 2010 |
I decided to comfort myself by getting out the three full tubs of my handspun yarn to see if I could put together something to weave a shawl with - since my loom is standing empty for the moment.
I spread out the contents of the tubs, and separated everything by color in the middle of the living room floor. I thought if I got it all out, maybe some of it would speak to me and tell me what it wants to be.
Well, it is still there. I must be deaf.
Sunday, August 22, 2010
It's Not Easy to Be Square
Since I have never woven an overshot project, I decided I should weave a sample just to try the structure out. So, I picked out a design from the book Weaving Designs by Bertha Gray Hayes.
I looked through my yarn stash to see what I had on hand that would work for my little sample and came up with 8/2 cotton. I found several different cotton possibilties for weft.
![]() |
| 3/2 Cotton Weft |
Next I tried two strands of 5/2 cotton in blue. This was better, but still not square.
In my stash, I had some green 16/2 cotton , so I used 4 strands of it as weft figuring that would be equal in weight to two strands of 8/2 cotton. The result was better but still not square. I started beating my weft in more firmly. I beat as hard as I could. The pattern got closer to square, but still it was not there. You can see in the photo where I started off beating not as firmly and toward the top began beating harder.
Peggy Osterkamp's recommended way to weave is that you beat - or rather place your weft - on an open shed, then immediately change to the next shed. The theory is that you place your weft with the beater while the warp is as wide as the reed makes it be, then before you move the beater away from the fell, change to the next shed.I decided to give these suggestions a try.
I am still out of sync, rhythm wise, but I am not sure you can ever really get a rhythm in an overshot pattern. The treadles are constantly changing and the shuttles are changing as well. I suppose time will tell about that.
Now I wish I had made that sample warp a little longer.
Tuesday, June 29, 2010
Adieu Knitwords
I was saddened last week to learn that my favorite Machine Knitting Magazine, Knitwords, is ceasing publication.This was a fabulous magazine for machine knitters. It contained fashionable sweaters for all ages and machine types featuring many techniques. It was a labor of love for the publisher, Mary Anne Oger. The love showed in every issue. I have them all, and refer to them every time I make a sweater on the machine.
The limited good news is that Mary Anne plans to be available for seminars. I hope she will continue to design and publish. She has so much talent and so many creative ideas for machine knitting.
Machine Knitters have so few resources left. For magazines, we have exactly two - Country Knitting of Maine News and Views and Machine Knitting Monthly from the UK.
I urge machine knitters everywhere to support the remaining publications. I would hate to loose them too. We need inspiration for the machine knitters today and those to come.
Thursday, June 10, 2010
First Warp for Ellie's Loom
Ellie's Loom is warped and I am finally weaving.The first warp is one that I had been planning for my 4 harness Le Clerc. It is yet another project from the Fall 2009 issue of Handwoven Magazine. The "recipe" is on page 44 and is titled "One threading, four patterns, four towels". I had already dyed the contrasting yarns so decided to proceed as planned. This is my fourth project from that issue of Handwoven, and I have more planned. (This may be the best issue ever)
The towels are huck variations. They appealed to me because huck is a new weave structure to me (most structures are since I am only a beginning level weaver), and with four different towels on the same warp, the bore factor should be conquered.
Learning to get along with Ellie's loom has been challenging. I think anytime a weaver deals with a new loom there is a lot to learn about how to get along with it. Everything is strange. The braking system, where to tie up the harnesses out of the way to thread, how to wind the beam where to tie the lease sticks and the list goes on.
Things went pretty smoothly until I started tying up the treadles. The Herald Loom was shipped with wire tie ups, and when I got the loom it had about eight - not enough for my project.
The wires that were in treadles showed signs of being bent with pliers. I got suspicious that Ellie must have had big problems with the wires jumping out of the holes in the lams. Perhaps this is the reason the loom has never been warped.
I researched on Ravelry and Weavolution and found out that indeed, the big complaint about Herald looms is the wire tie ups. Other weavers hated the loom because of the wire tieups. They experienced lots of problems keeping them attached to the lams. Another big disadvantage of the wires is that the treadle height cannot be adjusted, and since the treadles sit on a slant, the back wires or ties are necessarily shorter than the front one's.
Based on this information, I decided that I would most likely change out the wires for ties. I started researching my options. Texsolve cord was recommended. My investigation into it revealed I would have to spend about a hundred dollars to get enough cord to make every connection on the loom. At that point, I was not going to invest a lot of money in a loom that perhaps would not even work, so I needed a cheaper solution than Texsolve.
So, I went to my trusty references from Peggy Osterkamp. Peggy is a total genius. She knows everything about weaving. Her books cover absolutely every problem and question that I have ever had about weaving. I think any weaver with no support needs all of her books.
Peggy recommended tying up treadles with a snitch knot and cords. That is what I did but I used shoe laces for the tie cords, and some nylon cord for the snitch knot section.
I cut a length of cord that is about 10 inches long. I threaded a pony bead onto the cord (to prevent the knot from pulling through the hole), then folded the cord in half and tied a double overhand knot in the two ends. Next I took the loop and let the bead slide down to the knot. I threaded the loop through the hole in the treadle and made a snitch knot that I put my shoe lace ties through. I then adjusted the height of the treadles, looped the end of the shoe laces like the first half of a bow and the treadles were tied up.
After correcting a few threading errors, I am finally weaving. I have employed my poor man's temple for the waffle weave - alligator clips, cord and fishing weights!
Weaving is proceeding. I think I am going to love the loom and I sure love weaving in the airconditioning as opposed to my old studio in the unairconditioned garage.
Monday, May 31, 2010
Ellie's Loom
First a little history:Sometime probably in the late 70's or early 80's there was a weaver named Ellie who bought a new 45 inch 8 harness Herald loom with a sectional beam. I am sure Ellie dreamed of all the wonderful things she would weave on that loom.
Life must have interfered, because she never go around to weaving on her new loom. It never had a warp.
This year, Ellie, whose memory is failing, moved to assisted living. The unused loom remained behind, stored in a garage with only rats and mice for company. The harnesses collected a little rust.
Ellie's close friend and neighbor began the hard task of cleaning out Ellie's house. The loom went up for sale to another weaver.
------Over the last several years, I have been teaching myself to weave. When I started, I thought I would never get a 4 harness loom threaded properly. I marveled that anyone would ever want more harnesses.
However, time in the chair has cured most of my early problems with crossed threads and missed headles. So I decided that if a loom appeared with more than 4 harnesses and if it were inexpensive enough to get passed my strong tightwad nature, I would buy it.
I was at knitting group one day talking about this to some other weavers, and I told them that I was convinced my new loom would find me.
Then, over a week ago, there was a posting to both Weaver's Guilds that I belong to that there was an 8 harness loom for sale. The price was right but I hit delete on the emails because I just had no time to investigate the loom. I was going out of town for several days so the timing was just all wrong.
My friend Kay, of Cordova Studios, also knew that I was looking for a loom, so she kindly forwarded me the email announcement which I saw for the third time. I hit delete. I was just too busy to look into it.
I thought about it all weekend while I was gone. I finally decided that if the loom was still available when I got back (and I thought that was unlikely) that I would check on it and go look at it. So I did.The loom had not been sold to my surprise. No one had even looked at it. When I saw it, I knew my loom had indeed found me.
It took me a day to get it cleaned up. My husband has adjusted the brake. I think it is ready to warp.
I am now re-reading all my weaving publications, paying attention to all the new possibilities that 8 harnesses bring. I think it will keep me busy for a long time.
Now to get a warp on it!
Wednesday, May 19, 2010
Basketweaving - Not the Underwater Kind
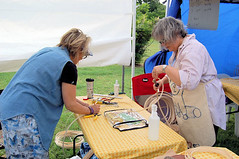
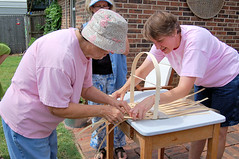
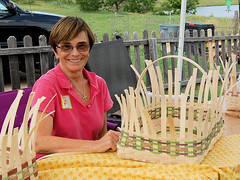
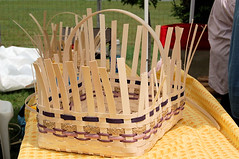
Today my Spinning Buddies, the Texas Twisters met at Nancy's house to learn to make a Spinning Basket. This basket is perfect for wool and even has a lazy kate built in as well as a tool holder and a small basket for trash or maybe hand cards or wool combs.
Nancy had everything well organized. We started by measuring all of our materials. The first photo shows Laurie and Joanne working on measuring and cutting the reeds.
Then we wove a couple of reeds on each side of the handle to get it stablized and centered. Finally we wove enough reeds to complete the bottom of the basket. Then we checked to be sure the corners were square.
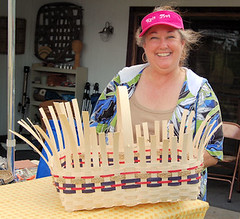
As we got higher up the sides, we added in some colored reeds to make each basket our unique work of art. No two are alike and each is beautiful.
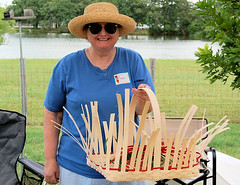
Here are photos of some of the baskets as they were at the end of the day. Unfortunately, I don't have photos of all of them.
First is Sharon with her basket. She used red and blue reeds in her basket.
We still have to add the upper basket on and finish the top edges. There is also another small tool basket to make that is attached to the side near the handle.
I hope we get to finish this next week. It is going to be beautiful and so much fun to use!
Sunday, May 2, 2010
Dyeing without a Dyepot

We explored using many objects as resists to the dyed paper. One popular resist was a feather. A sheet of paper was painted with the dye and allowed to dry. Then the resist object - in this case a feather, was laid on top of the fabric, followed by the face down dyed paper. The result was almost like an X-ray.
The transfers can be applied to sheer fabrics too. Dramatic effects can be achieved when a sheer layer with transfers on it is placed over an opaque layer also with transfers.Sunday, February 28, 2010
Grrreat Tiger Wool gets Gold!

Sock blanks are lots of fun to dye, but the knitted results are often not predictable unless the blank is painted in broad stripes. That is, unless the blank is dyed using a method I read about in the Grrreat Tiger Wool Experiment group on Ravelry.
Blanks dyed using this method have a predictable thin stripe of one color with other colors between the stripes. This is achieved by painting one side of the blank in a solid color, and the other side can be painted in a different color or several colors.
This photo shows my Go for the Gold Socks in progress on top of the dyed sock blank. Notice the blue on the blank has turned into thin regular stripes on the socks.
There are many other possibilities with this method. Faux fairisle can be put on the non-stripe side, or you can have the faux fairisle interrupt the striping for a ways. There are lots of photos in that Ravelry Group to get more ideas from. Check out the thread called Experiment #6
The distance between the stripes is determined by the width of the blank and the width of the solid area. To get a complete stripe, the solid area needs to contain a complete round of sock yarn. For me, this is just under 30" for a 60 stitch sock. Thirty inches translates into 40 knitted stitches at the stitch and row gauge I used to make this blank, so, my solid area needs to be 20 stitches wide down one side of the blank to get one solid row. The wider the blank is, the more rows of knitting I have between the solid stripes.
Now that I know the math, my next sock blanks will be machine knitted with this dyeing method in mind so I can get wider spacing between the stripes.
This was a really fun way to dye a blank, and the resulting socks got me a Gold Medal in the 2010 Ravelympics Sock Hockey event.I dyed another blank at the same time and have those on my needles now. They will be knitted in the Skew Pattern from Knitty Winter 2009. Skew should show off this type of sock yarn to great advantage.
Thursday, December 31, 2009
Weaving from the Viking Era
My third project from the Fall 2009 issue of Handwoven Magazine is off the loom and has been distributed as Christmas Gifts to a few special relatives and friends. The Viking Era Twill Towels were a big hit and were some of my best weaving to date.There were six towels on the warp, and I wove them with alternating weft colors so I would know where one stopped and the next one started. Half the towels have a light blue weft and the others have a cactus green weft.
The towels are from 2/8 Cotton set at 24 epi. This made a firm fabric which should be perfect for the job they need to do.
My towels finished at 15" wide rather than the 16" that the author got. The finished length was also shorter - about 22" after hemming each end with a 5/8" hem rather than the 24" long for the original.
It did take me a bit to get into the rhythm of the treadling. I found I had to pay close attention to what I was doing to get the treadling sequence correct and to catch the floating selvages properly. That meant no podcasts while I wove, so I am woefully behind on a lot of my favorites.My Husband still does not understand why anyone would weave dishtowels. I have told him that they are wonderful to use. Besides, they are a great way to explore weave structures, yarns and setts.
All in all this was a fun project that inched me along the learning curve to being a real weaver.
Sunday, November 22, 2009
Getting Footprinted
Yesterday, I had the great pleasure of attending a hand knitting seminar with the inspirational Cat Bordhi. Cat is known for her innovative designs for scarves, bags and socks. It was Cat's first book on socks - Socks Soar on Two Circular Needles - that actually got me to try socks again after a disaster on double points that left me with two socks, knit the same, but totally different in size.Cat's latest book - Personal Footprints for Insouciant Sock Knitters, is about yet another new approach to socks. The socks involve no math, no short rows and no partial knit rows. Every row is knit in the round. The fit is perfect!
The socks are personalized for the wearer, and the initial sock is developed as a foot map - or footprint template is created. Once the template is developed, it can be used over and over for more socks for the same person.In class, Cat coached us as we developed our templates. Most of us found that we needed fewer stitches for our feet than the traditional sock pattern calls for. My Socks That Rock yarn, knitted on size zero needles, needs only 48 stitches to fit my foot.
My leg opening needs 60 stitches. It would not be easy to do this with a standard sock pattern, but in a Footprint Sock it is no problem at all! This also explains why some socks give me such a poor fit.
Footprints socks are cast on at the toe, with a very simple cast on. The toe is increased, and when it is big enough, the foot is knit straight to the first increase point. This point varies from person to person based on the topology of their foot. Some people's foot gets thicker toward the ankle very quickly, while others, like mine have a gradual slope.
When increases are needed, they are done randomly or in a pattern on the sole of the sock. This leaves the top of the sock free for whatever designs the knitter wants to incorporate. The number of increase points and increases varies from person to person. The increase points and reference lines are marked on the template by trying the socks on the template. Subsequent socks only need to be tried on the template to see where the increases and other maneuvers are needed.
Once the increases are complete, the socks are knit straight to the leg opening point. This point is at the center of the leg. The correct sock length is found by trying on the sock and stretching it at the sides until it reaches the center point of the leg.At that point, the row is marked on the top of the sock with a marking thread. One more row is knit, and a second marking row is added. The leg opening is later cut, stitches are picked up and the leg is knit up from the opening.
Knitting continues to the heel point where the heel is decreased in a similar manner to the toe. The opening is closed later with a three needle bind off.
In addition to the easiest toe ever, Cat showed us a very stretchy bindoff that will be useful for not only socks, but for any bindoff that needs to be very stretchy. This bindoff will get lots of use, I am sure. Cat has videos of this bindoff and other techniques in the sock on YouTube.
I confess, I probably would not have tried this method for making socks unless someone made me sit down and do it. Putting this much effort into what amounts as a "sock swatch" is not my nature.
In class, I managed to get my initial footprint knitted almost to the leg opening point. Last night, I knitted almost to the heel decreases. Once the footprint is done, I can open the leg and add the cuff. Then I have to do the second sock - not my strong suit for sure. The next pair of these will definitely be done two at a time.
I have to say that so far the fit is the best ever! I think I am going to love these socks.
Monday, November 9, 2009
Saving Mr. Greenjeans
In 2008, I made a sweater published in Knitty called Mr. Greenjeans. I knitted it from my handspun yarn. I started trying to wear it, but it kept slipping down my shoulders. The fit was terrible, and so I decided to give it away. I promptly just forgot about it. The decision was made, and that was that. It was in the give away pile, however, I am very slow to actually get the box together and give something away.Last week, at my Monday knitting group, one of the ladies brought in a sweater, knit sideways from garter stitch. The yarn was beautiful, but she was really unhappy with the fit of the sweater. She said when she put the sleeves in, that it was just weighted down, and the fit was terrible. We discussed ways to fix it so she could wear it.
The problem was all the weight of the yarn stretching out the garter stitch - which likes to grow and grow and grow. It needed to be stabilized, so we suggested crocheting a neckband to give the neck stability and stop the garter stitch from stretching. We discussed how in sewing, that a lot of stabilization is put in the neck and shoulder area, since that is the foundation that the garment literally hangs from. Sweaters don't get this stabilization, but unless the yarn is very light weight, they need something. Machine knitters often crochet a chain across the back neck, and apply the neckband over the chain. The chain helps keep the back neck from stretching.
A couple of days later, I was still thinking about that pretty sweater, and I thought that perhaps adding a slipstitch row of elastic thread would help it. Then I had an a-ha moment. That was what Mr. Greejeans needed. Maybe that sweater could also be saved.
So today, I went digging in my sewing notions and found some black elastic thread. I slip stitch crocheted with the elastic through the row where I added the neckband on the inside of the sweater. I actually did two slip stitch rows on top of each other. Then the neckband seemed a little floppy, so I did the same thing about two rows down in the ribbing from the top. I put a stitch in each purl stitch and skipped the knit stitches. In the photo, you can see where I put the elastic. It does not show at all from the outside.I tried the sweater on, and was delighted with the new fit. The neck is now stable and I think the growing problem is solved. Mr. Greenjeans has been saved.
Friday, November 6, 2009
Drop by Drop
For several months, I have been planning a warp for the Summer and Winter Kitchen Towels in the Handwoven E-Book "Top Ten Towels on Four Shafts". In fact since June, five skeins of yarn have been scoured and waiting on the cabinet in my utility room. The time has long since passed to get them off the cabinet.The thing that has stopped me is the number of colors of yarn that are required. The towels use five different colors of 5/2 cotton plus white. I had exactly one of those colors - white.
When I started weaving, I decided I would try to dye many of the colors called for, since I do not want to add to the large supply of yarn that I have already. The problem is I have no formal art training, so my color mixing knowledge relies heavily on what I learned from finger paints in kindergarten.
For this project, my challenge came in mixing some colors that were close to the colors used in the original pattern - although I am sure other colors would be equally pretty. I really struggled over how to mix some of the colors especially the "California Gold". I had the yellow part down, but was not sure how to get the gold part. I also needed to mix a "Dark Turk" color and a coral color.
From my earlier fiber reactive dye experiments, I learned that the mixed dye solutions can be painted onto watercolor paper, and the dried samples are pretty close to what the actual dyed cloth or yarn will be. Someplace, I also saw that a coffee filter can be substituted for the paper. So, I decided to mix a gradation of the colors between two colors in 9 steps, and try out the coffee filters as a place to preserve my samples.
I used a watercolor mixing palette, and put drops of Deep Yellow in the indentations with an eyedropper. In the first indent, I put one drop, in the second two drops and so forth all around to the last one which got 10 drops. Next, I used Chocolate Brown dye solution and in the indentation with one drop of Deep Yellow, I put 9 drops of Chocolate Brown. The two drops of yellow got 8 drops of brown and so on around. I did not put any brown in the indentation that had the 10 drops of yellow. So each basin had a total of 10 drops of dye, giving a simple formula that can be used to mix larger quantities of that same color.
Next I used a paint brush to paint little samples of each color all around the coffee filter. Now I have a good idea about how to get that California Gold color, or rather my interpretation of it, for the warp for the towels. I also have samples of the colors that can be mixed from these two colors and a rough idea of how to get the color I am aiming for.
I repeated this sampling with the rest of the dye solutions I had mixed up. Now I have lots of color samples to use for a quick reference the next time I dye yarn or fabric.
I dyed the yarn which had been scoured and skeined for three months. It is now curing in my hot water heater closet. I will be rising it in a couple of days, so soon, I will be ready to wind the Summer and Winter Towels Warp. I also dyed some muslin for my She-Knits Autumn Mystery Bag which is felted and waiting for a lining.
This was a fun exercise. It made me think of the art classes I did not get to take. I really do have a lot of colors hiding in a few jars of dye powder.


.jpg)